Introduction
Your iPhone comes equipped with a built-in level tool that can be incredibly useful for various everyday tasks, from hanging picture frames to measuring angles. This tool is easy to access and provides accurate measurements, making it a handy addition to your toolkit. This guide will walk you through how to find, use, and make the most of the iPhone’s level tool in your daily life.
Step 1: Accessing the Level Tool
The level tool is part of the Measure app, which is pre-installed on most iPhones.
How to Find and Open the Level Tool


-
Locate the Measure App:
- On your iPhone’s Home screen, swipe left or right until you find the Measure app. The icon looks like a black ruler on a white background. If you don’t see it, swipe down to open Spotlight Search, type “Measure,” and tap the app from the results.
-
Open the Measure App:
- Tap the Measure app to open it.
-
Switch to the Level Tool:
- Once the Measure app is open, you may be in the default measuring mode. To switch to the level tool, tap the Level tab at the bottom of the screen.
As you explore the iPhone’s Measure app, don’t forget that optimizing your iPhone’s settings can significantly enhance your experience. Learn how to manage storage on your iPhone to ensure you have enough space for all your tools and apps.
Step 2: Using the Level Tool for Horizontal Surfaces
The level tool can be used to check the alignment of horizontal surfaces, ensuring they are perfectly level.
How to Use the Level Tool on Horizontal Surfaces

-
Place Your iPhone on the Surface:
- Lay your iPhone flat on the surface you want to check, such as a table or shelf.
-
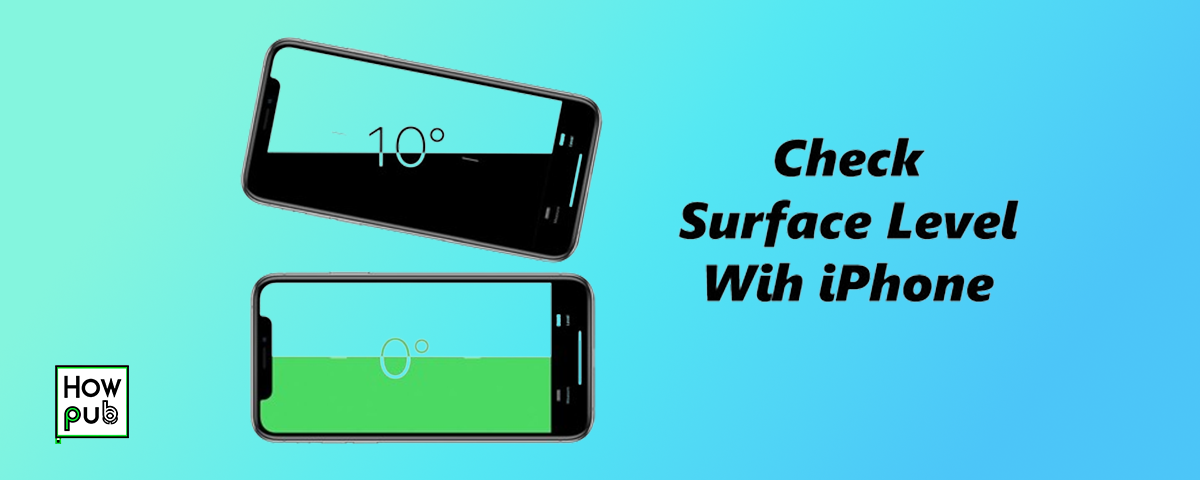
Read the Level:
- The screen will display a degree measurement. When the surface is perfectly level, the screen will turn green and show 0°. If the surface is not level, the degree of tilt will be displayed, along with arrows indicating which direction to adjust the surface.
-
Adjust as Needed:
- Use the level reading to make adjustments. For example, if you’re leveling a table, you might need to adjust the legs until the level reads 0°.
When ensuring your surfaces are perfectly level, it’s also helpful to keep your iPhone in top working condition for accurate readings. Check out these essential iPhone maintenance tips to ensure your device stays in peak performance for tasks like this.
Step 3: Using the Level Tool for Vertical Surfaces
The level tool is also useful for ensuring vertical surfaces, like walls or posts, are perfectly upright.
How to Use the Level Tool on Vertical Surfaces

-
Place Your iPhone Against the Surface:
- Hold your iPhone upright against the vertical surface you want to check, such as a wall or the side of a doorframe.
-
Read the Level:
- The screen will display the angle of the surface. If the surface is perfectly vertical, the screen will turn green and show 0°. If the surface is tilted, the degree of the tilt will be displayed.
-
Adjust as Needed:
- Make adjustments based on the level reading. For example, if you’re hanging a picture frame, you may need to reposition it until the level reads 0°.
When using your iPhone to ensure vertical accuracy, it's important to optimize your device for consistent performance. Learn how to enhance your iPhone’s battery life so you can rely on it during extended tasks like leveling and adjustments.
Step 4: Using the Level Tool for Angled Surfaces
The level tool can also measure the precise angle of inclined surfaces, which is useful for tasks like installing handrails or checking the slope of a roof.
How to Use the Level Tool on Angled Surfaces

-
Place Your iPhone Along the Angle:
- Align your iPhone with the angled surface, ensuring that it lies along the same plane as the angle you want to measure.
-
Read the Angle:
- The level tool will display the angle of the surface in degrees. This reading will help you determine whether the surface is at the correct angle for your project.
-
Make Adjustments:
- If necessary, adjust the surface to achieve the desired angle. For example, when installing a handrail, use the level tool to ensure the rail is set at the correct incline.
When working with angled surfaces, precision is key. To ensure your iPhone is functioning at its best for these tasks, optimize your iPhone’s performance so it can handle even the most challenging angles and measurements during your projects.
Step 5: Tips and Tricks for Using the Level Tool
To get the most accurate and effective use of the level tool, consider the following tips:
Tips for Accurate Measurements
-
Ensure a Stable Surface:
- For the most accurate reading, make sure your iPhone is on a stable, unmoving surface when using the level tool.
-
Calibrate the Tool:
- Although the level tool is usually accurate out of the box, you can recalibrate it if you suspect it’s off. Do this by placing your iPhone on a known level surface and adjusting the level to read 0°.
-
Use the Edge of Your iPhone:
- For more precise alignment on thin surfaces or when checking corners, use the edge of your iPhone rather than laying it flat.
-
Lock the Measurement:
- To keep a measurement on screen, tap the level display. This feature is useful if you need to move the iPhone while retaining the angle information.
Conclusion
The iPhone’s built-in level tool is a versatile and handy feature that can help you with various everyday tasks, from home improvement projects to simple adjustments around the house. By following this guide, you can make the most of this tool, ensuring accuracy and efficiency in all your leveling needs. Whether you’re hanging a picture, installing a shelf, or checking an angle, your iPhone has you covered. mobile-friendly content.