Introduction
Ever wondered how photographers achieve that stunning blurred background effect while keeping the subject in sharp focus? Apple's Portrait Mode and Depth Control features allow you to create professional-looking portraits with just your iPhone.
This guide explains how Depth Control and Portrait Mode work, their benefits, and how you can use them to elevate your photography skills.
What is Portrait Mode?
Portrait Mode is an iPhone camera feature that uses computational photography to create a bokeh effect—a beautifully blurred background while keeping the subject in sharp focus.
How It Works
- iPhones with dual, triple, or LiDAR cameras analyze depth using multiple lenses or sensors.
- The system intelligently isolates the subject and blurs the background digitally.
- Apple’s Neural Engine enhances edge detection for a natural blur effect.
Supported iPhones
Portrait Mode is available on:
- iPhone 7 Plus and later models
- All iPhone SE (2nd Gen and later)
- iPhone XR, XS, 11, 12, 13, 14, 15 series
📌 Pro Tip: iPhones with LiDAR sensors (Pro models) offer enhanced Portrait Mode even in low-light conditions.


How to Use Portrait Mode on iPhone
Steps to Capture a Portrait Mode Photo
- Open the Camera app.
- Swipe to Portrait Mode.
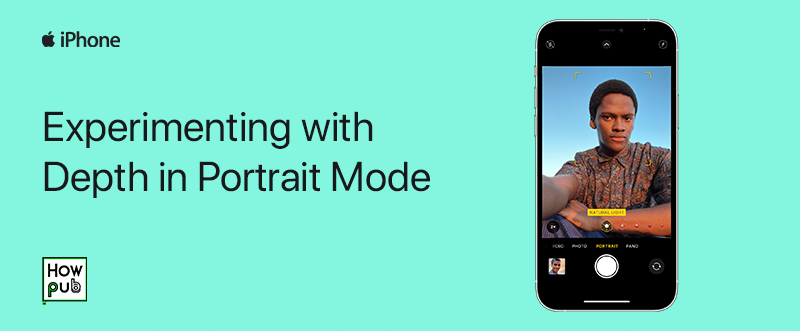
- Adjust framing until "Natural Light" or another effect appears.
- Tap on the subject to focus.
- Press the shutter button to take the photo.
🎯 Tip: Maintain a distance of 2-8 feet from the subject for the best effect.
Portrait Lighting Effects
iPhone also offers built-in studio lighting effects in Portrait Mode:
- Natural Light – Soft background blur.
- Studio Light – Brightens the subject's face.
- Contour Light – Adds shadows for a dramatic look.
- Stage Light – Darkens the background completely.
- High-Key Mono – Creates a black & white portrait.
💡 Try experimenting with different lighting effects to match the mood of your photos!
What is Depth Control?
Depth Control lets you adjust the blur intensity (bokeh) of a Portrait Mode photo after capturing it.
How to Adjust Depth Control
- Open the Photos app and select a Portrait Mode photo.
- Tap Edit in the top-right corner.
- Use the Depth slider (f/1.4 - f/16) to adjust background blur:
- Lower values (f/1.4) = More blur
- Higher values (f/16) = Less blur
- Tap Done to save changes.

🎥 Want more control? Use third-party apps like Halide or Focos for professional depth adjustments.
Comparing Portrait Mode vs. Depth Control
| Feature | Portrait Mode | Depth Control |
|---|---|---|
| Background Blur | Automatic | Adjustable |
| Lighting Effects | Yes | No |
| Works in Real-Time? | Yes | No (post-editing) |
| Available on All iPhones? | No | No (Requires iPhone XR & later) |
🔍 Best practice: Use Portrait Mode for quick shots and Depth Control for fine-tuned editing!
Tips for Better Portrait Photos
✔️ Use a neutral background to enhance subject focus.
✔️ Shoot in good lighting—natural light works best.
✔️ Position the subject properly—not too close to the background.
✔️ Try third-party apps like Halide for advanced manual controls.
✔️ Keep iOS updated to access the latest camera improvements.
Conclusion
Apple’s Portrait Mode and Depth Control offer powerful tools to take professional-quality photos with ease. Whether you're capturing portraits, pets, or even objects, mastering these features can elevate your photography game!